Wednesday, 29 June 2011

Hello stranger...

Well it really has been a while since I last posted on my blog. Last time I was here, was before my holiday to Malaysia. Then I had a load of marking to do that kept me busy for a while. So to work.... ;)

Well I have a bit of WIP that I was supposed to have posted up before my hols but I left the screengrabs so I'll go through it now.

Firstly, I realised that while the head was really coming together, there were some areas that still made it look WRONG. The eyes in the image below look like painted snooker cue balls and lack any sort of depth. So I needed to sort it. The solution was to make an eyeball out of 3 separate parts; a shiny outer, the eyeball itself that had a recessed iris and a separate black pupil modelled as a disc. With a morpher, I was able to introduce pupil dilation into the eye.


So I was able to go from this...(painted cue ball look)


to this, an eyeball with lots more depth


After that was done, I felt that I needed to introduce some shininess to the skin at the nose, forehead and ears with a specularity map. So here are some before and after images.


The last image was way too strong and the character looks almost wet with grease, so I needed to tone it down. As well as this, I had been curious to see if I could model a realistic ear as I wasn't entirely happy with the character's ears. So I created this...


I was happy that I could do it and I didn't feel that I needed to redo the fighter's ear afterwards, so I tweaked it as well as the texture for the face, giving him more prominent shadows under the eyes.


Now that is looking pretty good, I need to get a move on with the torso.


I'm mindful that I need to get this character completed and rigged for December. So I think that I should try to get all the textures completed by the end of August. That will give me from 3 months to do all the rigging. That sounds good and I'm looking forward to it. It seems that I've been working on this character for so long.


Friday, 18 March 2011

Let's get the textures started then...

It was about time that I got going with texturing the model and so I decided to kick off with the head. Using the UV template, I painted a very quick layer in photoshop to pinpoint areas like the eyebrows, chin and lips. Using the layout, I cut and pasted chunks of reference photos.


The image below shows some cut and pasted areas taken from photos. Hue of the different images needed to be sorted.

This is a test of the texture mapped onto the model.


 Front, side and back. I think that the top and side of the head needed a lot of attention in terms of colour.


Getting closer now.


I think that the head looked a bit pale at this stage....


The colours of the different parts had been adjusted to make them more compatible.


I decided to experiment with Mudbox to do a little surface detailing in terms of the pores and scars, simply to extract the normal map. The image below shows the result. Mudbox is really nice to work with and I'm glad to have found a solid workflow between 3DS Max and Mudbox to generate the fine surface details.


Here is a close up of the normal map extracted from Mudbox. It's pretty subtle but it works!


Nearly done but the seams on the head have been difficult to paint out owing to the UV template. I tried to use Mudbox to paint directly onto the surface of the model to clone out the seam seen in the image below.


It worked beautifully. This was fairly easy to set up and paint. So I think that I can consider the head to be sorted now. In the larger renders at the bottom, the pores show up rather nicely.


Almost forgot to mention that I decided to add eyelashes to the model too.


Now for the body....

Monday, 7 March 2011

This MA really has proven to be quite useful....

My practical work and research on my Masters has proven to be quite valuable in my teaching. I have some students at The Manchester College who are at the early stages of character modelling and showing them a lot of the information that I had found when I was researching edge loops and trying to mimic muscle structures of the face in polygons was very helpful.
Planning the polygon flow on a head is a good strategy
Some great examples of edgeloops and polygon flow
At Futureworks, a few of my second year students are modelling human heads and torsos for their self initiated projects and my research and practical work again proved valuable. Something that a colleague from The University of Huddersfield had said about my character's head was the poor flow of the nasolabial folds or laughter lines and as I have just finished remodelling my character's head, this was useful to use for reference.

Remodelled nasolabial folds on the left. Bad topology on the right.
Another feature that I struggled with was the sternomastoid muscle on the neck. This was something that a student needed to strengthen in their character's model. Once that pair of muscles are modelled onto the front and sides of the neck, other forms such as the larynx, pit of the neck and clavicles then flow from the structure quite easily.
Sternomastoid or to give it its full name:
sternocleidomastoideus

Lastly something that I really found tricky was the tricep. Until my brief exploration into Mudbox, I really wasn't happy with it. Anyway this was something that I one more of my students needed a little help with. I was happy to help!


Been playing with Mudbox.

I’ve been trying Mudbox and I’ve found it pretty useful. Compared to Z Brush whose interface is totally different to most 3D packages, Mudbox seems really intuitive. Seeing that it comes from the Autodesk stable, those familiar with Maya and 3DS Max shouldn’t find it a stretch to navigate and use.


After trying out the various tools, I’ve found that sculpting folds in clothing is very straightforward. As long as the models brought into Mudbox have been unwrapped then the UVs show the deformation. I haven’t worked through to creating surface detailing like pores yet. That will come.


It has been useful to play with Mudbox because I've at least been able to sculpt some parts of the figure that I wasn't happy with; around the collar bones in the image above and also the triceps (see the left tricep in the image below). Although I couldn't really use the Mudbox sculpts, it was useful to see the workflow between 3DS Max and Mudbox and back again. I used the high resolution sculpts as 3D templates to shape the model in 3DS Max!


Also I looked into extracting the high resolution detail in the form of a normal map. This is a fairly straightforward process. The normal maps do appear a little dirty – I’ll need to check the settings to see if there’s anything that can be done to make it more accurate. However it has proved to me that my workflow for this project is flawed.

Ideally a low poly model should be imported into Mudbox already unwrapped. The high poly model should then be created in Mudbox with all the surface details – folds in the clothing, veins, muscle detail and surface detail like pores and scars. Then the high poly detail should be exported (in Mudbox the process is called extraction) through various maps including normal maps. These maps can then be applied to the low poly model.

However, as I had already created quite a high poly model in 3DS Max already, any further refinements and surface detailing that I then create in Mudbox can only be baked back onto this fairly high poly mesh. If I create a separate low poly version, the UVs will be different so baking the extracted maps from Mudbox won’t work. So any sculpting that I perform in Mudbox will only work for the high poly mesh and the low poly one will be independent.

With that in mind, I’ll track back to getting the unwrapped UV template painted and move onto the rigging and skinning. 

Perhaps my next substantial portion of my work in my MA will involve the workflow of low poly model in 3DS Max, then putting in the detail in Mudbox, bake out the maps from Mudbox and apply them to the low poly model in Max for rigging. The poly count of the low poly model will depend on how my exploration over the next couple of months after I have my high poly character rigged.

Tuesday, 22 February 2011

It's been a long time since my last post...

I'm glad to have got all the marking from Semester 1 done. It allows me a little breathing space and now I can crack on with my work. I had planned to just finish off the model with a little tweak here and there but I got engrossed with the tweaks.

After detaching the arms and remodelling the shoulders, I had a chat to a colleague at The Manchester College and Richard gave me some feedback and said that I would really need to sort out the junction of the pec, deltoid and bicep. In previous models, it was looking a little too far out from the body. So I’ve pulled that area in and also I did a bit of remodelling on the underarm area.

I modelled the trousers as baggy sweat bottoms and I’m hoping at a later date that I’ll take this into either Z Brush or Mudbox to paint the folds of the cloth in detail.


I also reworked the nipple to make sure that if the model was subdivided through turbosmooth or meshsmooth that the geometry would be left in good shape so now the nipples take up 2 quads worth of space instead of being contained in a single quad.

I have found that the model although not perfect has been useful for demonstrating massing of the muscles and edgeloops around the torso for a number of students that I teach. Also the workflow showing how I’ve created the torso from box modelling has been good to demonstrate how I blocked in the main muscle groups. Admittedly I was being rather carefree with the triangles in the process.

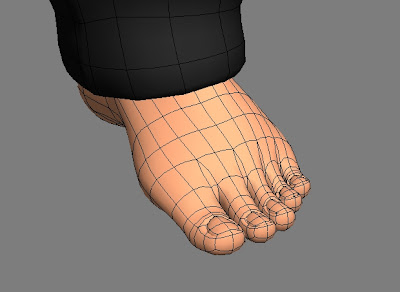
There was something not quite right with the proportions of the feet so I decided to rework it. I think it was the length of the toes that didn’t look quite right. But now I’m happy with how they look.


One area that I’m not totally happy with is the area of the triceps. It still somehow looks too rigid and defined, but after lots of work I still haven’t found a shape that looks natural. And while we are on the subject of flaws in the modelling, I found that whilst I was adding in detail in the tricep, I needed extra loops and I found that loops of the arms were travelling not only across the biceps, triceps, they were then looping down the arm towards the hand. It’s far too big a job to correct – I’ve tried without success and I think that it will take some time to remake but I want to continue with the modelling and get cracking on the unwrap and also the rigging so I’m going to make a mental note to take care on future models to be strict with the loops and rings in this area.

At this stage, I decided that I would unwrap the model and try to learn a new piece of software to boot. I have heard lots of great things about Headus UV Layout so I thought that I’d give it a try.

It’s interesting as I’d done a few concentrated sessions at Huddersfield to get them up to speed with unwrapping models in 3DS Max. Most students who are new to 3D software find UV Mapping and Unwrapping difficult concepts to get to grips with. So I planned 3 successive sessions with the students to make sure that they understand how it all works, going from the most common UV mapping concepts, through to Unwrapping simple boxes to dealing with Unwrapping complex geometry – I used a head as an exercise. I’m glad to reflect that the exercises were successful, I think that the fact that the students had a concentrated dose of UV Mapping and Unwrapping did the job. So after that, I thought that it would be worthwhile to use a piece of software that industry favours.

I had tried Roadkill but found it very clunky and the seam selection process was even worse than using Unwrap UVW in 3DS Max. So UV Layout seemed to be the best choice really.

After a few hours and several attempts, I managed to upwrap the entire figure and I’m happy with the results.

What’s nice about UV Layout is that the model is broken up into chunks – like defining seams in Unwrap UVW in 3DS Max but then the chunks (called Shells) are then flattened literally. You can see it happen before your eyes and it’s very clever. The process is like Pelt Mapping in 3DS Max only it’s done well. So here are the results of my labour.


Reference Images from “D’artiste: Character Modeling – Ballistic Publishing 2005)

“The Night Elf” by Max Kor

I showed my model to Daryl today and he told me that I needed to rework the edge loops that go around the mouth to the side of the nose – nasolabial folds (smile/laugh lines). After examining the model and comparing it to other examples found on the net, I think that it does need a little rework. May as well do it now!

NOTE TO SELF: WHEN UPLOADING IMAGES TO BLOGGER, UPLOAD THEM WITH NONE SET ON THE POSITION. I WISH THAT I COULD POSITION THE IMAGES IN EXACTLY THE PLACE THAT I WANT WITHOUT HAVING TO CUT AND PASTE HTML.....

Tuesday, 25 January 2011

Itching....

I've decided to redo the topology of the shoulders. I had a rethink on how I want to rig this character and I think that it'd be better to have the arms flat out in a T shape. I had a play on this a few days ago but haven't had any time since but I thought that I ought to update the blog and post the changes. Am itching to crack on with this but have lots of undergraduate work to mark. In fact, I'm drowning in work.....


Must admit that I don't like the interface to these Blogs. I managed somehow to follow my own blog earlier on and it took me ages to figure out how to unfollow myself!

Thursday, 13 January 2011

Completed High Poly Character

Here is the mesh of the high poly character. I'm happy with how the muscles have turned out.