After detaching the arms and remodelling the shoulders, I had a chat to a colleague at The Manchester College and Richard gave me some feedback and said that I would really need to sort out the junction of the pec, deltoid and bicep. In previous models, it was looking a little too far out from the body. So I’ve pulled that area in and also I did a bit of remodelling on the underarm area.

I modelled the trousers as baggy sweat bottoms and I’m hoping at a later date that I’ll take this into either Z Brush or Mudbox to paint the folds of the cloth in detail.

I also reworked the nipple to make sure that if the model was subdivided through turbosmooth or meshsmooth that the geometry would be left in good shape so now the nipples take up 2 quads worth of space instead of being contained in a single quad.
I have found that the model although not perfect has been useful for demonstrating massing of the muscles and edgeloops around the torso for a number of students that I teach. Also the workflow showing how I’ve created the torso from box modelling has been good to demonstrate how I blocked in the main muscle groups. Admittedly I was being rather carefree with the triangles in the process.
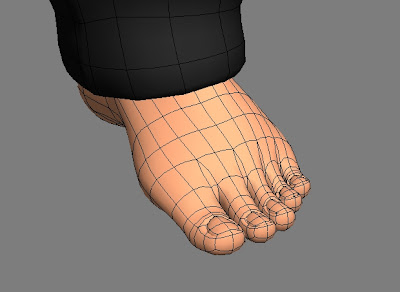
There was something not quite right with the proportions of the feet so I decided to rework it. I think it was the length of the toes that didn’t look quite right. But now I’m happy with how they look.
At this stage, I decided that I would unwrap the model and try to learn a new piece of software to boot. I have heard lots of great things about Headus UV Layout so I thought that I’d give it a try.
It’s interesting as I’d done a few concentrated sessions at Huddersfield to get them up to speed with unwrapping models in 3DS Max. Most students who are new to 3D software find UV Mapping and Unwrapping difficult concepts to get to grips with. So I planned 3 successive sessions with the students to make sure that they understand how it all works, going from the most common UV mapping concepts, through to Unwrapping simple boxes to dealing with Unwrapping complex geometry – I used a head as an exercise. I’m glad to reflect that the exercises were successful, I think that the fact that the students had a concentrated dose of UV Mapping and Unwrapping did the job. So after that, I thought that it would be worthwhile to use a piece of software that industry favours.
I had tried Roadkill but found it very clunky and the seam selection process was even worse than using Unwrap UVW in 3DS Max. So UV Layout seemed to be the best choice really.
After a few hours and several attempts, I managed to upwrap the entire figure and I’m happy with the results.
What’s nice about UV Layout is that the model is broken up into chunks – like defining seams in Unwrap UVW in 3DS Max but then the chunks (called Shells) are then flattened literally. You can see it happen before your eyes and it’s very clever. The process is like Pelt Mapping in 3DS Max only it’s done well. So here are the results of my labour.

I showed my model to Daryl today and he told me that I needed to rework the edge loops that go around the mouth to the side of the nose – nasolabial folds (smile/laugh lines). After examining the model and comparing it to other examples found on the net, I think that it does need a little rework. May as well do it now!
NOTE TO SELF: WHEN UPLOADING IMAGES TO BLOGGER, UPLOAD THEM WITH NONE SET ON THE POSITION. I WISH THAT I COULD POSITION THE IMAGES IN EXACTLY THE PLACE THAT I WANT WITHOUT HAVING TO CUT AND PASTE HTML.....


Nice job Ken
ReplyDeleteThanks Josh!
ReplyDelete